How to Set Up Raspberry Pi for Beginners: A Comprehensive Guide
Set up your Raspberry Pi with this easy guide! Learn to choose the right model, install the OS, troubleshoot issues, and start fun projects like home automation or retro gaming. Perfect for beginners looking to get started quickly
So, you got your hands on a Raspberry Pi; now what? Whether you’re diving into the world of single-board computers for the first time or looking to sharpen your skills, setting up a Raspberry Pi can feel a bit overwhelming. But don’t worry, this guide has you covered.From picking the right Raspberry Pi model to installing the OS and troubleshooting common issues, this step-by-step guide walks you through everything you need to know. Whether you want to build a home automation system, set up a retro gaming console, or simply explore Linux, you’ll learn how to get your Raspberry Pi up and running the right way.By the end of this guide, you’ll not only have your Raspberry Pi fully configured but also have a few project ideas to put it to good use. Let’s get started!
What You Will Learn
This comprehensive guide covers all the essentials for setting up and using your Raspberry Pi:
- Choosing the right Raspberry Pi model for your needs
- Gathering the necessary components and accessories
- Step-by-step instructions for assembling and booting your Raspberry Pi
- Installing and configuring the operating system
- Troubleshooting common issues
- Beginner-friendly project ideas to inspire creativity
Table of Contents
- What You Will Learn
- Table of Contents
- Best Raspberry Pi Models for Beginners
- Raspberry Pi Getting Started Guide
- Raspberry Pi Basic Setup Steps
- Raspberry Pi OS Installation Guide
- How to Use Raspberry Pi for the First Time
- Raspberry Pi Troubleshooting Tips
- What Can You Do with a Raspberry Pi?
- Conclusion
- Sources
- FAQ
Best Raspberry Pi Models for Beginners
Choosing the right Raspberry Pi model is the first step in your Raspberry Pi getting started guide. Below, we break down the top choices for beginners, including newer releases like the Raspberry Pi 5 and Raspberry Pi Zero 2 W, to help you pick the best fit for your projects.
Raspberry Pi 5 vs Raspberry Pi 4 Model B vs. Raspberry Pi 400
The following breaks down the Raspberry Pi 5, Raspberry Pi 4 Model B, and Raspberry Pi 400, highlighting their key differences
- Raspberry Pi 5
- RAM Options: You can choose the RAM capacity that best suits your project needs, from the budget-friendly 2GB to the high-performance 16GB
- Performance: Features a 2.4GHz quad-core ARM Cortex-A76 CPU (up to 3x faster than Pi 4) and up to 8GB RAM, ideal for demanding projects like media servers, AI experiments, and gaming.
- Connectivity: Dual 4K HDMI ports, USB 3.0/2.0, Wi-Fi 6, Bluetooth 5.0, and PCIe 2.0 support for faster storage expansion.
- Cooling Needs: Requires active cooling (e.g., a fan) for sustained heavy workloads.
- Raspberry Pi 4 Model B
- RAM Options: Available in 2GB, 4GB, or 8GB of RAM, allowing you to choose based on your project requirements and budget.
- Performance: Offers powerful performance and versatility, making it suitable for a wide range of applications.
- Connectivity: Includes multiple USB ports, Ethernet, Wi-Fi, and Bluetooth, providing robust connectivity options.
- Raspberry Pi 400
- Form Factor: Integrated into a keyboard, simplifying the setup process for beginners.
- User-Friendly: Designed for ease of use, making it an excellent choice for those who prefer an all-in-one solution.
- Portability: Compact and sleek, suitable for use as a desktop computer or for portable projects.
Bonus: The Raspberry Pi Zero 2 W is a great choice for lightweight projects where size and power efficiency matter more than raw performance.
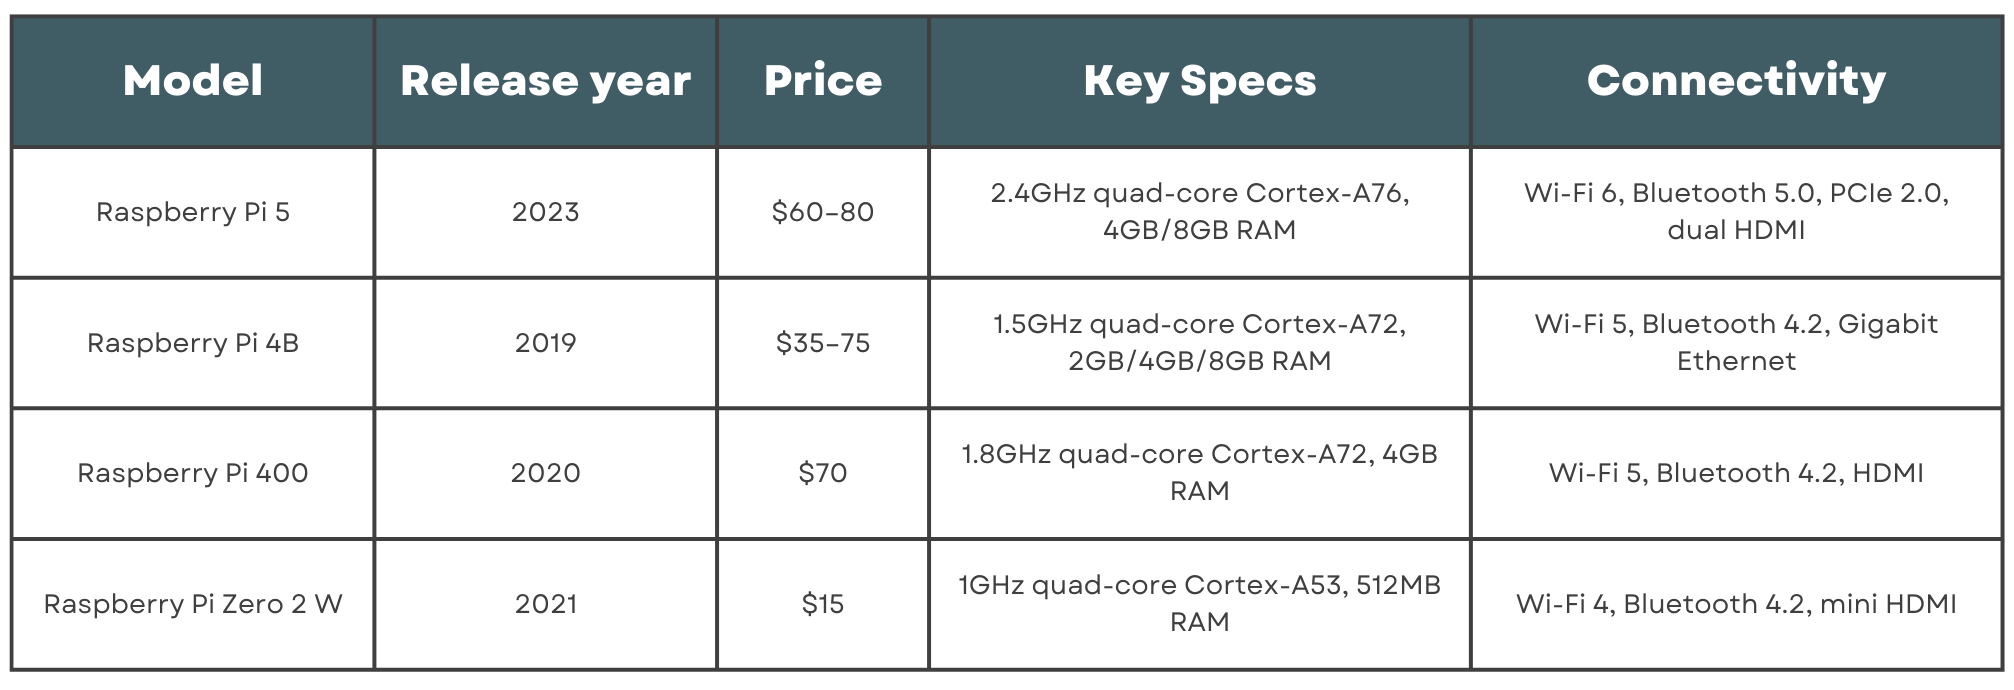
Best Raspberry Pi Models for Beginners Comparison
Factors to Consider When Choosing a Model
When selecting the best Raspberry Pi model for beginners, consider the following factors:
- Processing Power: Determine the level of performance required for your intended projects.
- RAM Options: Choose the amount of RAM based on your project's demands.
- Connectivity: Ensure the model has the necessary connectivity options like Wi-Fi, Bluetooth, and Ethernet.
- Power Consumption: Consider the power requirements and ensure your power supply is adequate.
- Budget: Factor in your budget constraints when selecting a model with the appropriate features.
Choosing the right model ensures a smooth start to your Raspberry Pi journey. Whether you’re building a robot or a home server, there’s a Pi for every skill level and budget.
Raspberry Pi Getting Started Guide
Starting with Raspberry Pi is easy with the right components and setup. This Raspberry Pi getting started guide covers everything you need to begin your journey.
Essential Components and Accessories Needed
Before you begin, gather these essential components:
- Raspberry Pi Board: The heart of your setup.
- Power Supply: A 5V, 3A power adapter.
- MicroSD Card (at least 16GB): Great for getting started quickly or experimenting with smaller projects. However, it’s not the best long-term solution if you’re planning to run more demanding applications or do a lot of read/write operations—microSD cards can wear out faster and generally have slower speeds.
optional- SSD (Solid-State Drive) HAT | DRIVE: If you want faster boot times, improved reliability, and smoother performance, go with an SSD. It’s a bit pricier and requires a compatible USB or SATA adapter (HAT for the Pi), but the boost in speed and longevity is totally worth it—especially if you’re building a home server, media center, or any project that relies heavily on disk access.
For the SSD vs. microSD debate: Use a high-endurance microSD card (e.g., SanDisk Extreme) for lightweight projects, but switch to an SSD for server/desktop use. The Pi 5’s PCIe support makes NVMe SSDs a game-changer!
- HDMI Cable: To connect your Pi to a monitor or TV.
- USB Keyboard and Mouse: For input and navigation.
- Monitor or TV: To display the Raspberry Pi interface.
Optional but highly recommended accessories:
- Case: Protects your Pi from dust and damage.
- Heatsinks: Helps dissipate heat during intensive tasks.
- Ethernet Cable: For a stable wired internet connection.
- Card Reader/Writer: Allows you to read and write data on your microSD card.
Not all accessories may be necessary, depending on the kit you purchase. Check what’s included and adjust accordingly.
- Case Kit: Includes a Raspberry Pi case, cooling fan, heatsinks, and sometimes a power switch. Ideal for protecting and cooling your Pi.
- Complete Kit: Typically includes everything you need; Raspberry Pi, power supply, microSD card, HDMI cable, case, heatsinks, and sometimes even a keyboard/mouse combo. Perfect for an all-in-one solution.
Unboxing and Identifying Key Parts
Set up a clean, well-ventilated workspace with easy access to power outlets and internet connectivity. This ensures that your Raspberry Pi operates efficiently and prevents overheating during use.
Having a clutter-free area will help you stay organized and focused during the setup process. When you unbox your Raspberry Pi package, you’ll find several key components:
- USB Ports: For connecting peripherals like keyboards, mice, and USB drives.
- HDMI Ports: To connect to a display device.
- GPIO Pins: General Purpose Input/Output pins for connecting hardware components.
- Power Input: Where you plug in the power supply.
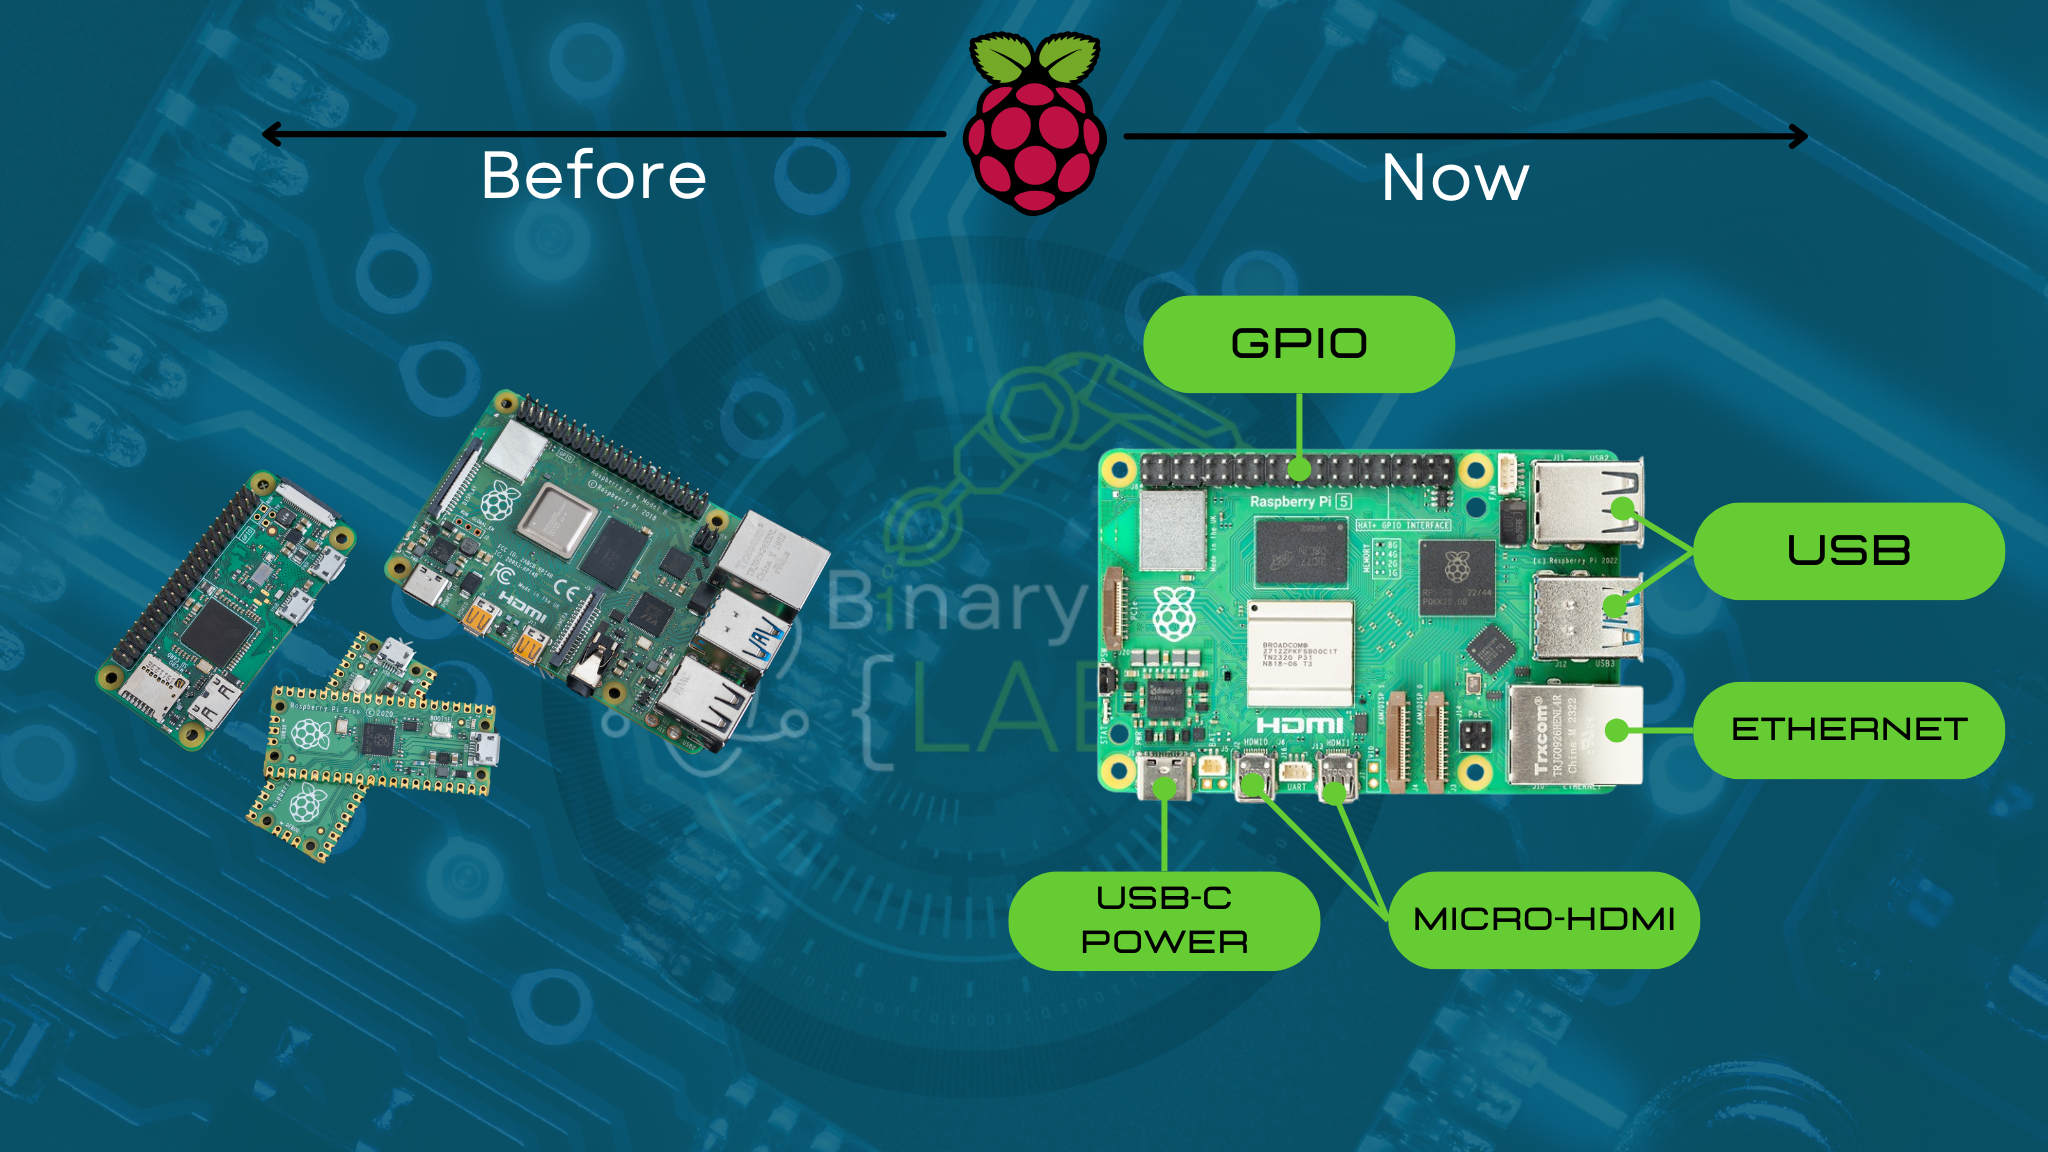
Raspberry Pi Evolution: From Then to Now 🚀🔧
Tip: Use a printable cheat sheet for your Pi’s GPIO pins to get familiar. It saves time when wiring or coding later.
Raspberry Pi Basic Setup Steps
Follow these Raspberry Pi basic setup steps to get your device up and running smoothly, or check out one of my previous videos:
Step-by-Step Instructions for Initial Setup
- Download & Install OS: Visit the official Raspberry Pi website and download the Raspberry Pi Imager tool.
Pro Tip: Raspberry Pi Imager allows you to pre-configure your settings; ssh, host, wifi, etc
- Insert the MicroSD Card: Start by inserting the microSD card into the Raspberry Pi’s card slot.
- Connect the HDMI Cable: Plug one end of the HDMI cable into the Pi and the other end into your monitor or TV.
- Plug in the USB Keyboard and Mouse: Connect these peripherals to the Pi’s USB ports.
- Connect the Ethernet Cable: If you’re using a wired internet connection, plug the Ethernet cable into the Pi.
- Connect the Power Supply: Finally, plug in the power supply to boot up your Raspberry Pi.
Connecting Peripherals
Ensure that each peripheral device is securely connected:
- Keyboard and Mouse: Plug into the USB ports.
- Monitor: Confirm the HDMI cable is firmly connected to both the Pi and the display device.
- Ethernet: If using, ensure the cable is connected to both the Pi and your router.
Properly connecting peripherals is essential for a functional setup.
Raspberry Pi OS Installation Guide
Installing the operating system is a crucial part of how to set up Raspberry Pi for beginners. This Raspberry Pi OS installation guide will help you through the process.
Downloading the Appropriate Raspberry Pi OS
- Visit the Official Website: Go to the Raspberry Pi official website and download the Raspberry Pi Imager tool.
- Select the OS: Typically, you’ll choose Raspberry Pi OS, which is user-friendly and suitable for most projects.
Creating a Bootable SD Card
- Insert the MicroSD Card: Place the microSD card into your computer’s card reader.
- Open Raspberry Pi Imager: Launch the Raspberry Pi Imager tool you downloaded.
- Choose the OS: Select "Raspberry Pi OS" from the list of available operating systems.
- Select the SD Card: Ensure your microSD card is chosen as the target.
- Write the OS: Click "Write" to start creating the bootable SD card.
Installing and Configuring the Operating System
- Insert the SD Card: Place the bootable SD card into your Raspberry Pi.
- Boot the Pi: Power up your Raspberry Pi by connecting the power supply.
- Follow On-Screen Instructions: Configure language, timezone, and set up your user credentials as prompted.
This process ensures that your Raspberry Pi is ready for use with the necessary software installed. For more advanced setups, such as self-hosting a WordPress website, you can explore your Raspberry Pi’s functionality.
How to Use Raspberry Pi for the First Time
Once your Raspberry Pi is set up, it's time to learn how to use Raspberry Pi for the first time. This section will guide you through the initial interactions and configurations.
Navigating the Raspberry Pi Interface
After booting up, you’ll see the Raspberry Pi OS desktop. Navigating this interface is similar to other operating systems:
- Mouse: Use it to click and interact with icons and menus.
- Start Menu: Access applications and settings from the start menu located at the top left corner.
Familiarizing yourself with the desktop environment will make using your Raspberry Pi easier.
Basic Configuration Settings
Access the Raspberry Pi Configuration tool from the Preferences menu to perform basic configurations:
- Display Settings: Adjust screen resolution and display options.
- Regional Preferences: Set your preferred language, time zone, and keyboard layout.
These settings help tailor your Raspberry Pi to your preferences and ensure optimal performance.
Installing Essential Software and Updates
Keeping your system updated is crucial for security and functionality. Open the terminal and run the following commands:
sudo apt update && sudo apt upgrade -y
sudo apt update: Refreshes the package list.sudo apt upgrade: Installs the latest updates and patches.
For those interested in expanding their Raspberry Pi’s capabilities, consider exploring Home Assistant integration to transform your Pi into a powerful home automation hub.
Regularly updating your Raspberry Pi ensures you have the latest features and fixes.
Raspberry Pi Troubleshooting Tips
Even with careful setup, you might encounter issues. Here are some Raspberry Pi troubleshooting tips to help you resolve common problems.
Common Setup Issues and Resolutions
-
Power-Related Problems
- Issue: Pi doesn’t power on.
- Solution: Ensure you’re using a proper power supply (5V, 3A for Pi 4). Check the power cable and connections.
-
Boot Failures
- Issue: Raspberry Pi doesn’t boot or shows a blank screen.
- Solution: Verify the SD card’s integrity and ensure it’s properly inserted. Try reformatting or using a different SD card.
-
Display Issues
- Issue: No display or incorrect resolution.
- Solution: Check the HDMI connection and ensure the monitor is set to the correct input. Adjust resolution settings in the Raspberry Pi Configuration tool.
Diagnosing Hardware and Software Problems
Identify whether issues are hardware or software related:
-
Hardware Issues
- Signs: Physical damage, unresponsive peripherals, no power.
- Steps: Re-seat cables, check connections, and test with different peripherals.
-
Software Issues
- Signs: OS not loading, errors during boot, application crashes.
- Steps: Reinstall the operating system, update software, or check for corrupted files.
Resources for Additional Support
If you encounter problems you can’t resolve, consult the following resources:
- Official Raspberry Pi Forums: A community-driven platform where you can ask questions and find solutions.
- Raspberry Pi Documentation: Comprehensive guides and troubleshooting tips provided by the Raspberry Pi Foundation.
These resources offer valuable assistance and can help you overcome any hurdles during your Raspberry Pi setup.
What Can You Do with a Raspberry Pi?
The Raspberry Pi is a versatile tool that opens up a world of possibilities. So, what can you do with a Raspberry Pi? Here are some beginner-friendly projects to get you started.
Introduction to Various Projects Suitable for Beginners
The Raspberry Pi's flexibility makes it ideal for a wide range of projects, from simple to complex. These projects help you learn programming, electronics, and system administration while having fun.
Examples of Educational and Hobbyist Applications
-
Setting Up a Media Center: Transform your Raspberry Pi into a home media server using software like Kodi. This allows you to stream movies, music, and other media directly to your TV or monitor.
-
Creating a Retro Gaming Console: Install RetroPie to emulate classic gaming consoles. Relive your favorite retro games by transforming your Raspberry Pi into a retro gaming station.
-
Building a Weather Station: Connect sensors to your Raspberry Pi to monitor and display weather data. Track temperature, humidity, and other environmental factors in real-time.
-
Learning Programming with Python: Use your Raspberry Pi as a platform to practice and enhance your coding skills. Python, a beginner-friendly language, is perfect for creating simple scripts and more complex applications.
-
Home Automation Projects: Integrate your Raspberry Pi with smart home devices to automate tasks. Control lights, thermostats, and other appliances through your Pi, creating a smart and efficient home environment. For a comprehensive setup guide, refer to our Home Assistant Blue: Build Your Own Modern Smart Home Hub tutorial.
Additionally, exploring self-hosting a WordPress website, Drupal, or Ghost on your Raspberry Pi can further enhance its capabilities, allowing you to manage your own content and services.
Conclusion
Setting up a Raspberry Pi involves several key steps: choosing the right model, gathering necessary components, installing the operating system, and performing basic configurations. By following this Raspberry Pi getting started guide, you ensure a smooth setup process and lay a solid foundation for your projects. The how to set up Raspberry Pi for beginners process is straightforward, making it accessible even if you're new to computing.
Once your Raspberry Pi is up and running, the possibilities are endless. From setting up a media center to building a weather station, these projects help you learn valuable skills in programming, electronics, and system administration. Don’t hesitate to start experimenting with your Raspberry Pi and explore its full potential.
For continued learning and support, utilize the vibrant Raspberry Pi community and official documentation. These resources offer extensive information, troubleshooting tips, and inspiration for your next project. Additionally, consider expanding your setup with Home Energy Management Systems to monitor and optimize your energy usage effectively.
Embark on your Raspberry Pi journey today and discover the power of this incredible single-board computer!
Sources
Raspberry Pi Blog | Tom's Hardware | Jaycon
By following this comprehensive guide, you’re well on your way to mastering your Raspberry Pi. Whether you're aiming to enhance your tech skills, create innovative projects, or simply explore the world of computing, the Raspberry Pi is an excellent starting point. Happy tinkering!
FAQ
What Raspberry Pi model is best for beginners?
What essential components do I need to set up a Raspberry Pi?
How do I install the operating system on my Raspberry Pi?
What should I do if my Raspberry Pi doesn’t boot?
Where can I find support if I encounter issues during setup?
You can seek help from the Official Raspberry Pi Forums or consult the Raspberry Pi documentation.
💡 Important Disclosure
This article contains affiliate links, which means I may earn a small commission if you click through and make a purchase—at no additional cost to you. These commissions help support the ongoing creation of helpful content like this. Rest assured, I only recommend products and services I personally use or genuinely believe can provide value to you.
Thanks for Your Support!
I truly appreciate you taking the time to read my article. If you found it helpful, please consider sharing it with your friends or fellow makers. Your support helps me continue creating content like this.
- Leave a Comment: Got questions or project ideas? Drop them below—I'd love to hear from you!
- Subscribe: For more tutorials, guides, and tips, subscribe to my YouTube channel and stay updated on all things tech!
- Shop & Support: If you're ready to get started, check out the recommended products in my articles using my affiliate links. It helps keep the lights on without costing you anything extra!
Thanks again for being part of this community, and happy building!