Self-Hosting A Free Website with Raspberry Pi 5 – Setting Up WordPress
Learn how to set up WordPress on a Raspberry Pi 5, secure it with Cloudflare, and use Apache for reliable web hosting.
Did you know that WordPress powers over 40% of the web? Now imagine hosting your own WordPress site on a device as small as your pocket. With a Raspberry Pi 5, you can turn this vision into reality—combining affordability, portability, and the satisfaction of a hands-on DIY project.
This guide will take you step-by-step through the process, from setting up WordPress to securing your site with an SSL certificate via a Cloudflare tunnel. With Apache as your web server, you’ll enjoy a reliable and robust hosting solution tailored to your needs. Ready to transform your Raspberry Pi into a self-hosted WordPress powerhouse?
Let’s get started!
Disclaimer: Hosting a website from home can expose your network to security risks. Always ensure you have robust security measures in place, and consult with your ISP to confirm that hosting is permitted under your service agreement.
How to Navigate This Guide
This guide covers how to set up a self-hosted WordPress website on a Raspberry Pi 5. WordPress offers a user-friendly platform for blogging, portfolios, and business websites. After installing WordPress, continue with the Cloudflare setup to boost security and performance.
- Complete the Core Setup: Follow the steps here to install and configure WordPress on your Raspberry Pi 5.
- Finalize with Cloudflare: Once WordPress is installed, proceed to our Cloudflare Setup Guide to enhance your site’s security, performance, and optimization.
Related Articles
- Self-Hosting A Free Website with Raspberry Pi 5 – Setting Up Ghost
- Self-Hosting A Free Website with Raspberry Pi 5 – Setting Up Drupal
- Self-Hosting A Free Website with Cloudflare Setup Guide
Why Host WordPress on a Raspberry Pi 5?
The Raspberry Pi 5 is a powerful single-board computer capable of hosting WordPress with ease. Its energy efficiency, affordability, and small form factor make it ideal for self-hosted projects. Here’s why you might choose a Raspberry Pi 5 for hosting:
- Cost-Effective: No need for expensive hosting plans.
- Learning Opportunity: Explore server management, WordPress setup, and SSL implementation.
- Customization: Total control over your hosting environment.
What You’ll Need
The speed of your Raspberry Pi affects how quickly your website can perform tasks, such as saving data to external storage. In this tutorial, we are using a Raspberry Pi 5 with 8GB of RAM, but a Raspberry Pi 4 is also capable of hosting a WordPress blog:
- Raspberry Pi 5 Kit with a power supply, MicroSD card, Power Supply, Case and Heat sinks
- External storage (optional) for larger WordPress sites, Requires HAT and Drive.
- Network: Reliable internet connection
- Domain Name: A registered domain name pointed to your server's IP address
- Cloudflare Account: A free account to manage DNS and SSL
Get Started: Setting Up Your Linux Server Environment
Once you have the necessary hardware, the next step is to set up your Linux server environment. Using Ubuntu Server on your SSD or NVMe drive provides a robust and efficient platform that's well-suited for hosting your WordPress blog. While microSD cards are fine for testing purposes, SSDs or NVMe drives offer significantly better performance and reliability for production use. Here's how to get your Linux environment up and running:
Install Your Linux Distribution
Choosing the right Linux distribution is key to ensuring smooth performance on your Raspberry Pi. Ubuntu Server is an excellent choice due to its minimal footprint and compatibility with most web hosting requirements.
- Download the OS: Start by downloading the Ubuntu Server image from the official Ubuntu website. Choose the 64-bit version for optimal performance and compatibility with modern applications. You can also use Raspberry Pi OS Lite (64-bit) successfully.
- Prepare Your Storage Device:
- For Testing (MicroSD Card): If you're in the testing phase, a microSD card will suffice. Ensure it's a high-quality, high-speed card to minimize performance bottlenecks.
- For Production (SSD or NVMe Drive): For a stable and fast production environment, use an SSD or NVMe drive connected via USB 3.0. This setup significantly enhances read/write speeds and improves overall reliability.
- Flash the OS Image: Use a tool like Raspberry Pi Imager or balenaEtcher to flash the Ubuntu Server image onto your chosen storage device.
- Open Raspberry Pi Imager on your computer.
- Select "Choose OS" and pick Ubuntu Server 22.04 LTS (64-bit) from the list.
- Select "Choose Storage" and choose your target storage device—this could be an SSD, NVMe drive, or microSD card.
- Click "Write" to initiate the flashing process. A prompt will appear asking if you'd like to customize your installation.
- Choose "Yes" to access customization options:
- Set Hostname: Assign a unique name to your Raspberry Pi for easy identification on your network.
- Enable SSH: Activate SSH for remote access by selecting this option and setting a secure password or providing an SSH key.
- Configure Wi-Fi: Enter your Wi-Fi network's SSID and password to enable wireless connectivity.
- Set Locale: Adjust language, time zone, and keyboard layout to match your preferences.
- After configuring these settings, proceed with the flashing process.
After successfully flashing the OS image onto your chosen storage device, it's time to boot up your Raspberry Pi. Insert your SSD, NVMe drive, or microSD card into the Raspberry Pi, connect it to a power source, and allow it to start. The system will initialize and set up the basic environment, which may take a few minutes on the first run.
Once your Raspberry Pi has booted up, the next step is to update your system to ensure it has the latest features and security patches. If you’ve preconfigured SSH during the flashing process, you can simply SSH into your Raspberry Pi from another device on the same network using a command like this:
ssh [email protected]
hostname you set earlier. If the hostname isn't working, you can use the Pi's IP address instead.)
If SSH wasn’t preconfigured, you’ll need to connect a keyboard and monitor to your Raspberry Pi to make some initial changes. Once logged in, follow these steps:
- Update your system to ensure it’s secure and stable by running:
sudo apt update && sudo apt upgrade -yThis command refreshes the package list and applies available updates.
- Enable SSH for remote access (if it isn’t already enabled) by running:
sudo systemctl enable ssh
sudo systemctl start ssh
Now, with SSH enabled, you can manage your Raspberry Pi remotely from any device on the same network. This provides flexibility and convenience for future configurations.
Pro Tip: For enhanced SSH security, disable password-based logins and use key-based authentication. Edit the SSH config file (/etc/ssh/sshd_config) and setPasswordAuthentication no. This minimizes vulnerability to brute-force attacks.
You have successfully set up and prepared your Linux server environment. Next, you’ll proceed to configure your web server and install your database, bringing you closer to launching your self-hosted website.
Web Server Installation ✅
With your Linux environment ready, the next step is to set up a web server. For this guide, we’ll be using Apache HTTP Server. Alternatively, you can use NGINX, which is a popular choice for hosting due to its lightweight design, speed, and compatibility with modern web standards.
- Apache: Known for its versatility and ease of use, Apache HTTP Server is a great choice for beginners. It handles dynamic content efficiently, supporting pages that rely on scripting languages like PHP.
- Nginx: Optimized for speed and memory efficiency, Nginx excels at serving high-traffic sites and static content. It manages multiple simultaneous connections with ease, though it does have a steeper learning curve for new users.
Setting up Apache on your Raspberry Pi is a straightforward process. Follow the step-by-step commands below to install and configure Apache:
- Update Your System
Before installing Apache, make sure your system is up-to-date:
sudo apt update && sudo apt upgrade -y
- Install Apache HTTP Server
Install Apache using the package manager:
sudo apt install apache2 -y
- Verify Apache Installation
After installation, verify that Apache is running by checking its status:
sudo systemctl status apache2
You should see a message indicating that Apache is active and running.
- Test Apache
To confirm Apache is working:- Open your browser and go to your Raspberry Pi's IP address (e.g.,
http://192.168.x.x). - You should see the default Apache welcome page. (To find your Pi’s IP address you can use this command:
hostname -I
- Open your browser and go to your Raspberry Pi's IP address (e.g.,
- Enable Apache to Start on Boot
Ensure Apache starts automatically when the Raspberry Pi reboots:
sudo systemctl enable apache2
- Adjust Firewall Settings (if applicable)
If you haveufw(Uncomplicated Firewall) enabled, allow HTTP traffic:
sudo ufw allow 'Apache'
- Restart Apache (to Apply Changes)
After making any configuration changes, restart Apache:
sudo systemctl restart apache2
Pro Tip: If you expect high traffic or want faster response times, enable caching modules likemod_cacheandmod_expires. Usesudo a2enmod cache expiresto improve page loading speed for repeated visitors.
Database Installation
A reliable database is essential for storing and managing your website’s data, especially when using a platform like WordPress that relies on databases for content, user information, and configuration settings. For this setup, MariaDB is a popular open-source option that serves as a high-performance, drop-in replacement for MySQL. Known for its simplicity and compatibility, MariaDB is an excellent choice for self-hosting, efficiently handling dynamic content and ensuring smooth, dependable operation.
Installing MariaDB
Follow these steps to install and configure MariaDB on your Linux server.
- Update Your System: As always, it’s a good practice to start by updating your package list to ensure you’re downloading the latest version of MariaDB. Open a terminal and enter:
sudo apt update && sudo apt upgrade -y- Install MariaDB: Use the following command to install MariaDB on your system. This command will download MariaDB along with all necessary dependencies:
sudo apt install mariadb-server -y- Start and Enable MariaDB: After installation, start the MariaDB service and set it to run automatically on startup with these commands:
sudo systemctl start mariadb
sudo systemctl enable mariadb
This ensures that your database server is up and running whenever your server is active.
- Secure the Installation: For security, it’s important to configure MariaDB by running the following security script:
sudo mysql_secure_installationThis will prompt you to set a root password and make some security adjustments, such as removing anonymous users, disallowing remote root login, and deleting the test database. For each prompt, it’s generally recommended to select the secure option (Y) to strengthen the database’s security.
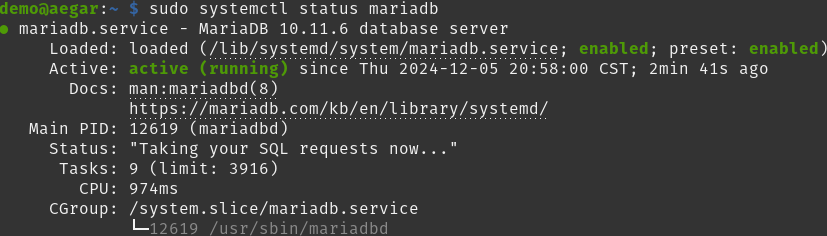
- Verify Installation: To confirm MariaDB is running, use the following command to check the service status:
sudo systemctl status mariadbYou should see an active status, indicating that MariaDB is up and running.
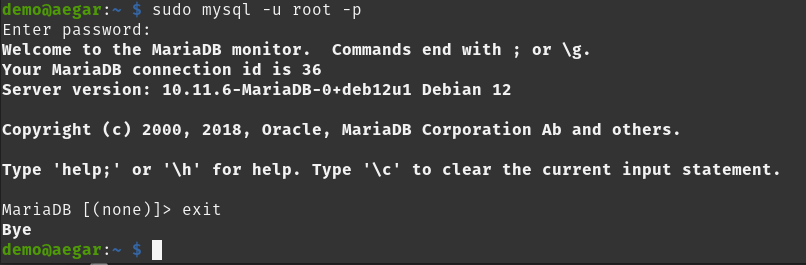
You can also log into the MariaDB shell to confirm:
sudo mysql -u root -pEnter the root password you set during the secure installation step. If you successfully enter the MariaDB shell, the installation is complete.
Pro Tip: Installmysqltunerto monitor and optimize MariaDB performance over time. Runsudo apt install mysqltunerand periodically check for recommended adjustments as your database grows.
Installing and Configuring PHP
Follow these steps to install and configure PHP on your Linux server to ensure compatibility with WordPress.
- Update Your System
Before installing PHP, ensure your package list is up-to-date. This ensures you’re getting the latest stable version of PHP available.
sudo apt update && sudo apt upgrade -y
- Install PHP and Necessary Extensions
sudo apt install php php-mysql -y
- Verify the Installation
Confirm that PHP has been installed successfully:
php -v- Restart Apache
For the changes to take effect, restart the Apache web server:
sudo systemctl restart apache2
PHP is now installed and configured on your server for running WordPress. With the required extensions and settings in place, your system is ready for the next steps in the installation process.
Installing and Configuring WordPress
WordPress is a highly popular platform known for its ease of use and flexibility. Here’s how to install and configure it with Apache and MariaDB:
- Download WordPress:
- Create a new directory and move into your new web server’s directory (typically
/var/www) and download WordPress:
cd /var/www
sudo wget https://wordpress.org/latest.tar.gz
sudo tar -xvzf latest.tar.gz
sudo rm latest.tar.gz
cd wordpress- Create a Database for WordPress:
- Log into MariaDB with this command
sudo mysql -u root -pand create a database and user for WordPress: (If you haven't already from the previous section)
CREATE DATABASE wordpress_db;
CREATE USER 'wordpress_user'@'localhost' IDENTIFIED BY 'secure_password';
GRANT ALL PRIVILEGES ON wordpress_db.* TO 'wordpress_user'@'localhost';
FLUSH PRIVILEGES;
EXIT;
Replace wordpress_db , wordpress_user, and secure_password with your own values. This setup grants the user access to the database, which your website platform will use to store and retrieve data. With MariaDB installed and configured, you now have a fully operational database ready to support your website.
- Configure WordPress:
- Rename
wp-config-sample.phptowp-config.phpwith this command:
sudo mv wp-config-sample.php wp-config.php- Open
wp-config.phpin the WordPress directory withsudo nano wp-config.phpand add your database details:
define( 'DB_NAME', 'wordpress_db' );
define( 'DB_USER', 'wordpress_user' );
define( 'DB_PASSWORD', 'secure_password' );
define( 'DB_HOST', 'localhost' );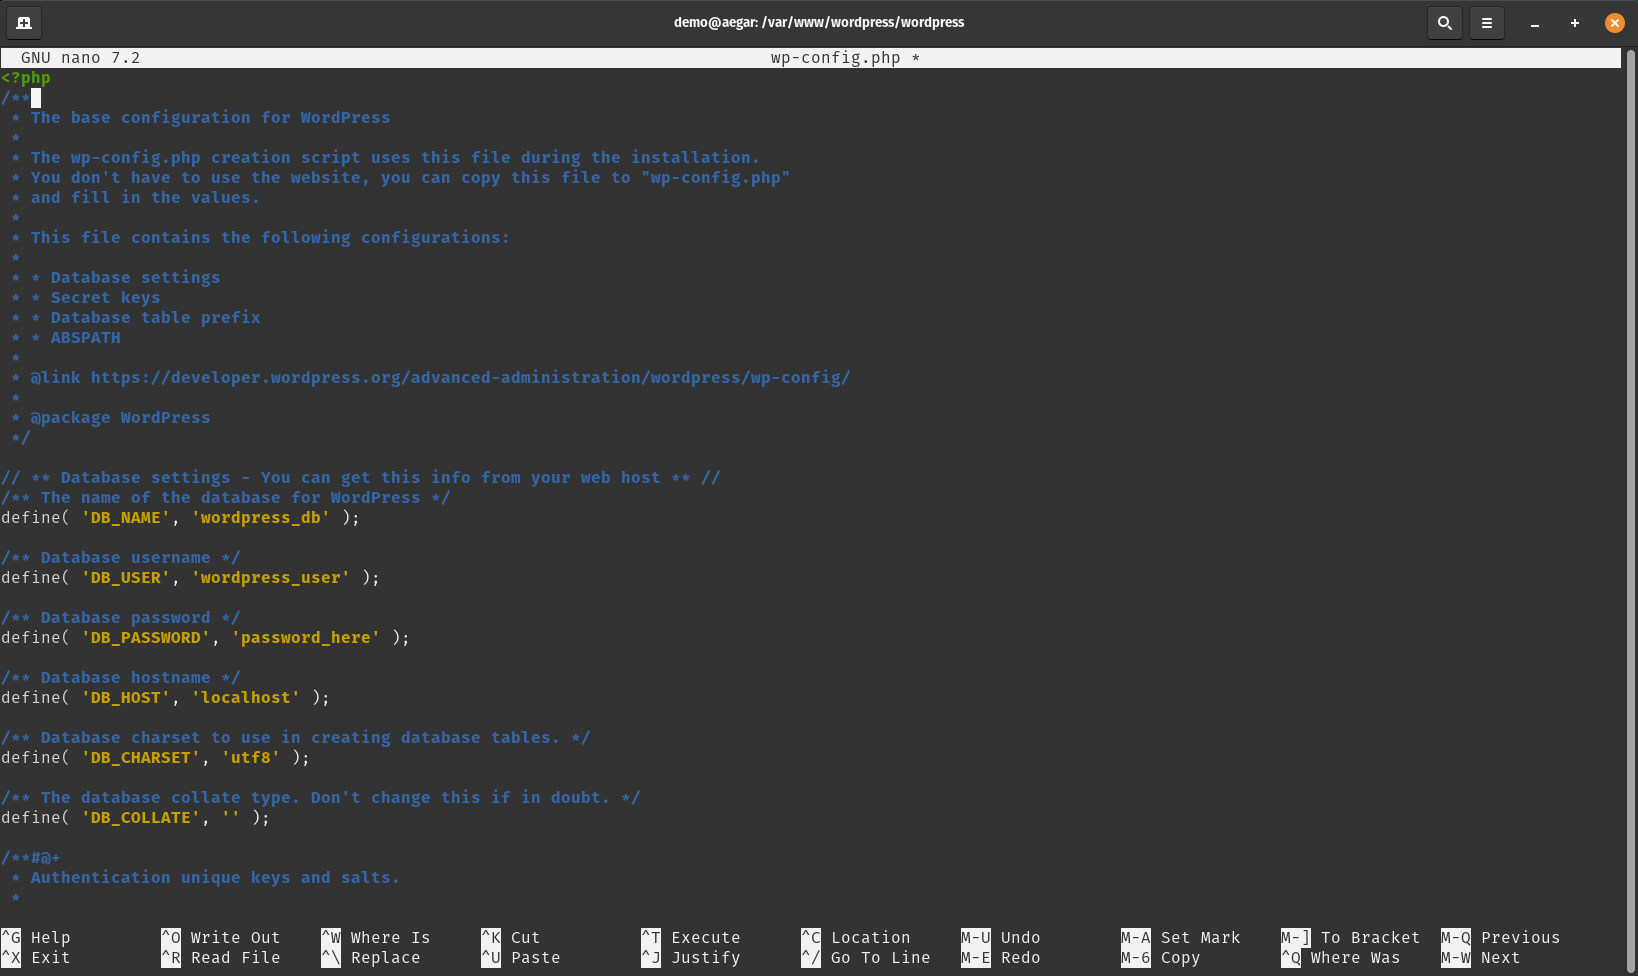
Once you have made the changes, you can press CTRL-X then Y and finally ENTER to save the changes.
- Set Up Permissions:
- Adjust the ownership of the directory (
chown) to thewww-datauser and group and the permissions (chmod) to prevent unauthorized access, to which Apache uses to serve content:
sudo chown -R www-data:www-data /var/www/wordpress
sudo chmod -R 755 /var/www/wordpress
Setting Up an Apache Virtual Host for WordPress
To configure Apache to serve your WordPress site, you'll need to create a virtual host file:
- Open a new configuration file for your site:
sudo nano /etc/apache2/sites-available/wordpress.conf
- Add the following content:
<VirtualHost *:80>
    # Handle requests to the Raspberry Pi's local IP
    ServerName 192.168.x.x

    DocumentRoot /var/www/wordpress

    <Directory /var/www/wordpress>
        Options Indexes FollowSymLinks
        AllowOverride All
        Require all granted
    </Directory>

    ErrorLog ${APACHE_LOG_DIR}/wordpress_error.log
    CustomLog ${APACHE_LOG_DIR}/wordpress_access.log combined
</VirtualHost>
You should be able to copy and paste this into the nano editor with CTRL-SHIFT-V
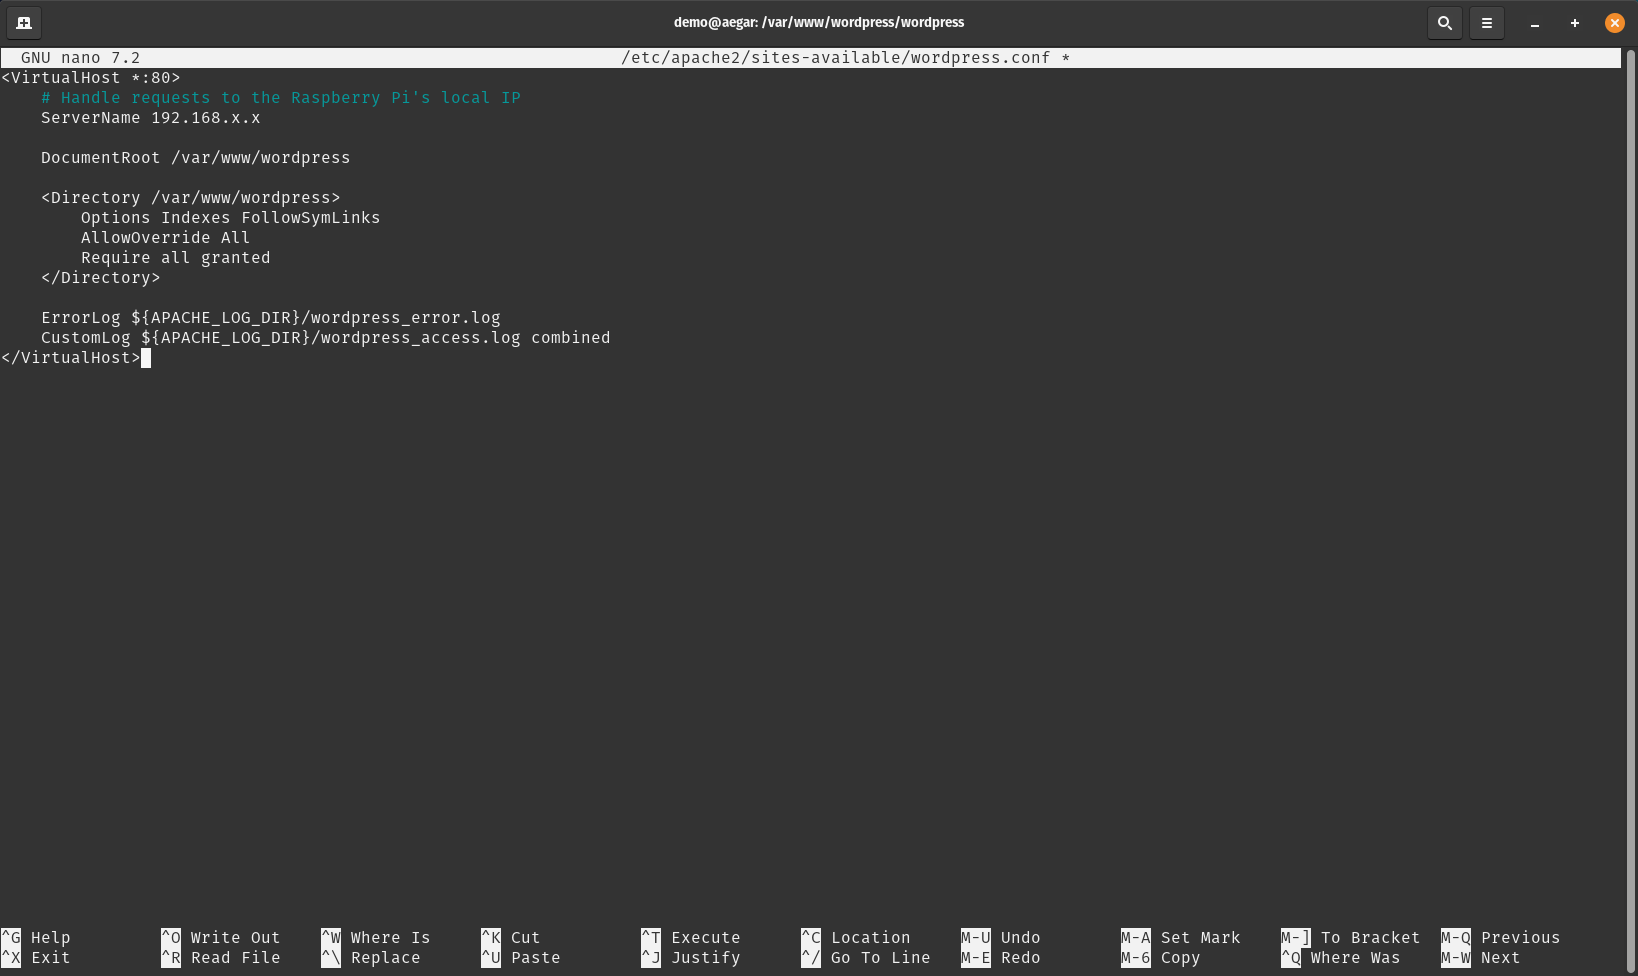
Replace the ServerName 192.168.x.x with your Pi's IP address. Again, once you have made the changes, you can press CTRL-X then Y and finally ENTER to save the changes.
- Enable the new site and the required Apache modules:
sudo a2ensite wordpress.conf
sudo a2enmod rewrite
- Restart Apache to apply the changes:
sudo systemctl restart apache2
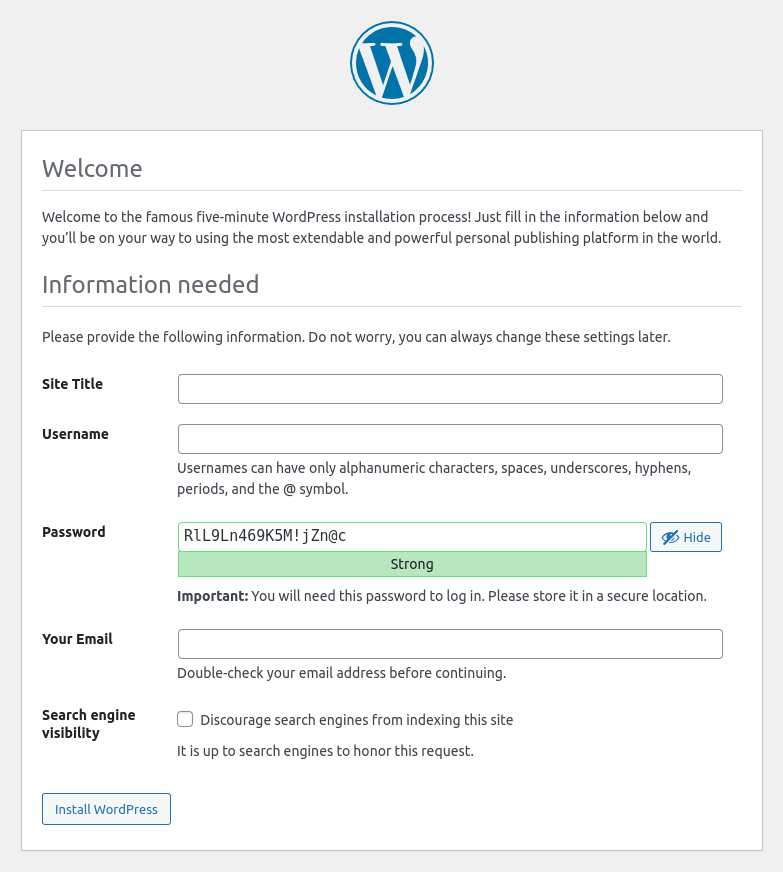
- Complete the Installation:
- You can now go to
http://your_server_ip/wordpressin your browser and follow the setup prompts to complete the installation.
As mentioned earlier in this guide, this is the point where you transition to our Cloudflare setup article to configure your domain.
Maintenance: Keeping Your Site Running Smoothly
Regular maintenance is essential for ensuring your self-hosted site remains secure, responsive, and up-to-date. By setting up automated backups, regularly updating software, and understanding common issues, you can keep your website running smoothly with minimal downtime.
Updating
Keeping both your system and application software updated is crucial for security and functionality.
- System Updates:
- Regularly update your server’s operating system to ensure security patches and new features are applied. On most Linux distributions, use:
- Use cloud storage services like Google Drive, Amazon S3, or Dropbox for remote backups. This adds an extra layer of protection in case of hardware failures on your main server.
Pro Tip: Set up automated backups with a cron job to ensure your data is safe. Usemysqldumpfor database backups andrsyncfor file backups. For example, schedule backups usingcrontab -eand add this line:0 2 * * * mysqldump -u root -p drupal_db > /path/to/backup.sql.
sudo apt update && sudo apt upgrade -y- Consider setting up unattended upgrades to automate security updates:
sudo apt install unattended-upgrades
sudo dpkg-reconfigure unattended-upgrades- Application Updates:
- CMSs like WordPress, Drupal, or Ghost frequently release updates with security patches and new features. Set notifications to remind you when updates are available, and regularly check the platform’s dashboard or use plugins to automate updates.
- For other applications, review each update’s release notes, especially if you’ve customized your setup, to ensure compatibility with existing plugins and configurations.
Tip: Over time, backup files, cache, and logs can consume significant disk space. Use tools like ncdu to visualize disk usage and periodically delete unnecessary files
Use monitoring tools like UptimeRobot or Pingdom to receive alerts if your site goes offline. These tools monitor server response times and can send notifications via email or SMS if they detect downtime.
By scheduling regular backups, staying on top of updates, and proactively addressing common issues, you’ll maintain a secure, efficient website that continues to deliver a reliable experience to visitors.
Conclusion
By hosting WordPress on a Raspberry Pi 5, you gain a flexible and budget-friendly platform for your website. With the added security of a Cloudflare tunnel and the reliability of Apache, your self-hosted WordPress site can rival traditional hosting options. Experiment, learn, and make it your own.
Now that your site is live, what’s next on your Raspberry Pi journey? Let me know if you’re tackling additional projects or need help expanding your WordPress setup!
Resources and Further Learning
Building and maintaining a self-hosted website is a continuous learning journey, and accessing the right resources can make the process much smoother. From online forums and educational platforms to comprehensive documentation, here are some valuable resources to help you troubleshoot, expand your skills, and stay up-to-date with the latest best practices.
Forums
Online forums are essential for troubleshooting issues, sharing ideas, and connecting with other developers and enthusiasts. Here are some of the best forums for support and guidance:
- Stack Overflow: An extensive community of developers ready to help with coding and development questions. Whether you’re stuck on server configuration, coding errors, or platform-specific issues, Stack Overflow’s vast archive of questions and answers is invaluable.
- Raspberry Pi Forums: For those using a Raspberry Pi as their server, the official Raspberry Pi Forums offer dedicated support for Pi-specific challenges. Topics include hardware compatibility, networking setup, and project ideas, making it a go-to resource for Pi users.
- Cloudflare Community: The Cloudflare Community is a hub for users looking to optimize DNS settings, enable CDN, and troubleshoot performance issues. Here, you’ll find advice from both Cloudflare experts and experienced users, covering everything from basic SSL configurations to advanced performance settings.
Educational Resources
Learning platforms offer structured courses and hands-on labs to build foundational skills in Linux, networking, and web development. Consider these resources for guided learning:
- Udemy & Coursera: Both Udemy and Coursera feature a variety of courses tailored to different skill levels. Topics range from Linux administration and server management to full-stack web development and networking essentials. Look for courses with high ratings and hands-on labs for practical experience.
- YouTube Channels:
- Binary Tech {LABS}: A source for straightforward tutorials on DIY tech projects, home automation, and Raspberry Pi setups. Binary Tech {LABS} breaks down complex topics into easy-to-follow steps, making tech accessible for everyone from hobbyists to experienced users.
- NetworkChuck: Known for his engaging, step-by-step tutorials on networking, server setup, and cyber security. NetworkChuck’s videos simplify complex topics like DNS configuration, server administration, and Docker, making them accessible for beginners and advanced users alike.
- Traversy Media: A popular channel covering web development and backend technologies. From HTML basics to setting up Nginx and Apache, Traversy Media provides clear, practical guidance on various web technologies.
Documentation
Official documentation is a key resource for understanding the inner workings of each platform and ensuring your setup aligns with best practices. Bookmark these resources for in-depth information, configuration options, and troubleshooting steps:
- WordPress Codex: The WordPress Codex provides detailed guidance on setting up and customizing WordPress sites. It includes tutorials, best practices, and references for WordPress functions and theme customization.
By leveraging these community forums, educational platforms, and official documentation resources, you can deepen your understanding, solve technical challenges more effectively, and keep improving your self-hosted website setup.
💡 Important Disclosure
This article contains affiliate links, which means I may earn a small commission if you click through and make a purchase—at no additional cost to you. These commissions help support the ongoing creation of helpful content like this. Rest assured, I only recommend products and services I personally use or genuinely believe can provide value to you.
Thanks for Your Support!
I truly appreciate you taking the time to read my article. If you found it helpful, please consider sharing it with your friends or fellow makers. Your support helps me continue creating content like this.
- Leave a Comment: Got questions or project ideas? Drop them below—I'd love to hear from you!
- Subscribe: For more tutorials, guides, and tips, subscribe to my YouTube channel and stay updated on all things tech!
- Shop & Support: If you're ready to get started, check out the recommended products in my articles using my affiliate links. It helps keep the lights on without costing you anything extra!
Thanks again for being part of this community, and happy building!